Showing posts with label Microsoft Windows 10. Show all posts

Sunday, September 24, 2023

How To Install Photos Legacy, and Microsoft Windows App Store

Microsoft is upgrading well-known apps such as Paint and requiring an app store download to install the legacy Paint app. For those with MS Windows login accounts not using an email address, using the Microsoft app store will encounter issues. It appears Microsoft is focused on forcing installs from their app store, along with sign-in via an email address.

A couple apps you may want to download from the app store are Paint Legacy and Power Tools. In a web browser, login to a Microsoft email address such as a Hotmail account. Then go to the web version of the app store and search for your app. Then click button "Get in Store App" and it may download and install. This can avoid using the app store app which is now built in to MS Windows.


After logged in to a Microsoft account on web browser (to hotmail.com or live.com or other Microsoft email hosting), use the following links:
  • MS Photos Legacy     ( https://apps.microsoft.com/store/detail/microsoft-photos-legacy/9NV2L4XVMCXM )
  • MS PowerToys     ( https://apps.microsoft.com/store/detail/microsoft-powertoys/XP89DCGQ3K6VLD )

The download window claims there are in-app purchases available in the Photos Legacy app.


Be aware that Power Toys will add items to context menus such as File Explorer.

Monday, July 17, 2023

File History in Microsoft Windows

Microsoft Windows File History is a type of backup will periodically copy files to another location or another computer. If you lose the files, you can restore from the backup copies. The backup copies will be saved at a destination file store location. The destination location is often a network drive or on a locally attached USB drive which can be quickly removed each evening. A locally attached hard drive on the same machine does not provide geographic redundancy like a network drive, though it can be used to provide file backups. This post describes how to set up File History in Microsoft Windows 10. 


This first example uses a locally attached drive (because it is straightforward to set up local drive is without potential networking issues). The second example will use a network drive.

To set up File History, begin by ensuring you have access to the network share. In File Explorer, open the network share. If prompted for login, enter the login information and check the box for "Remember my credentials".


Next, open the Backup application. If the app is already running, close it and re-open it. Press the MS Windows Start button and type: backup settings
Choose the Backup application.


Choose "Add a drive". 
For this example, drive D: is chosen.


The blue text of "More options" will allow configuration on how often to back up and how long to store backups. Many people will set "Keep my backup" to "Until space is needed".


Under "Back up these folders" choose "Add a folder" and choose a folder. When your folder choice is visible, click on it. You may want to remove some of the folders, such as "Saved Games" or "Favorites". This example will back up the personal music directory. 


Press "Back up now" and the file history backup will begin.

Press the back arrow to confirm "Automatically back up my files" is set to on. 


Press "More options" to go to the "Backup options" screen to learn when the initial backup is complete. This shows the backup is in process with "Backing up your data...".


You may want to use File Explorer to go to the backup drive and confirm a new folder was created with your Windows PC user name and machine name.


In case the PC is destroyed physically or by malware, it will be useful to have File History backups stored on a network drive away from the primary machine. In general, File History configuration is the same, though networking must be properly configured. Occasionally an issue is encountered with the network share.

This example uses the network resource with name NASIX. Confirm you have credentials to access the network share by clicking on the network share or by typing the share name in File Explorer as: \\share-name


The following error message was displayed. This is somewhat confusing in that the network resource appears to be available in Windows File Explorer, yet an error is encountered when attempting to open the resource even before a logon or credential is requested. You may try the "Diagnose" button.


In this example, the error message "Windows cannot access \\sharename" may require several steps to troubleshoot. If you do not have an error connecting, you may skip over this troubleshooting section.
First, log on to the actual network device an ensure it is properly shared. Next, open the Windows PC, open a command prompt by pressing Start button and type: cmd

In the following "net use" example, "z:" can be any available letter and "nasix" is the name of your network share. In the command prompt, type the following: net use z: \\nasix

You may encounter system error 51 or system error 53 such as, "System error 53 has occurred. The network path was not found." 
  • Ensure the necessary networking components are installed and are running. Open "features" from the Start button to open "Optional features". 
  • Clear out any old credentials for the resource. Press Start button and "credential manager". Click on Windows Credentials and remove any out-dated credentials.
  • Ensure the SMB client is installed. Open "services.msc" from the Start button and ensure the "Network Connections" is started. 
  • Open the old control panel app from the Start button, type "control panel", choose "Network and Internet", "View network computers and devices".
  • Also in the old control panel app, search for "sharing" and choose "Manage advanced sharing settings" then confirm network discovery and file sharing are turned on. Double-check all of the discovery and sharing options.


If none of this fixes the system error 53 problem, it may be useful to add a key to the Registry. Tampering with the registry may cause significant problems and may affect future software upgrades in surprising ways. Make a note of what you change in the Registry so you may remove it if necessary.
Press the Start button and type "regedit". Choose Registry Editor. On the left pane, navigate to HKEY_LOCAL_MACHINE\SYSTEM\CurrentControlSet\Services\LanmanWorkstation\Parameters and add a key named AllowInsecureGuestAuth as DWORD 32-bit. Set the value to 1. In File Explorer, try to open the network resource. 


Logs for File History may be found in the Event Viewer at %SystemRoot%\System32\Winevt\Logs\Microsoft-Windows-FileHistory-Engine%4BackupLog.evtx

File History settings are also available in the older Control Panel app, at Control Panel\System and Security\File History


Sunday, March 19, 2023

Who Needs the Optional Features in Microsoft Windows

Minimizing the applications and services on your computer can help to reduce the hacker attack service. If an app or service does not exist and can not be started, then it can not be exploited. The consumer desktop version of Microsoft Windows is good at keeping backward compatibility. This unfortunately leads to increasing hacker attack service and bloated installations.

Microsoft Windows 10 can remove some of the unneeded software. In this example, we will remove the .Net Framework.


The command prompt command "systeminfo" shows the following:

OS Name:                   Microsoft Windows 10 Home
OS Version:                10.0.19045 N/A Build 19045

Before starting, please create a restoration point in case you want to undo the changes. Press Start button, type "restore", choose Create A Restore Point.


On the desktop, press the Start button then press the Settings icon (the gear).

In the Windows Settings, choose Apps and click Optional Features. This may request the administrator prompt, which is required to continue.

Click on Optional Features.


Scroll down and click More Windows Features. 


This will display the Windows Features box. 


Deselect .NET Framework. 


Press OK and apply the changes.


Reboot to finish the changes.


Saturday, February 04, 2023

Hide Icons On Microsoft Windows Desktop

Anyone updating applications may notice that links to start the app often appear on the desktop. While these can often be easily deleted, if they are instead hidden then the next time the app is updated the link is likely to remain and stay hidden.

Microsoft has been pushing icons and shortcuts to the desktop. A recent Windows 10 patch rollup put a Microsoft Edge icon on the desktop, and it requires administrator privilege to remove it. 


Regular users can hide the icon with a quick command window. Bring up the command prompt by pressing Start button, type cmd, and press the Command Prompt app.

In the command prompt window, go to the desktop folder by typing:
cd desktop

Look for the file with the directory command and a flag:
dir /A

If the file does not exist, it may be in the Windows public profile. On the desktop, right-click on the icon, choose Properties, press the Details tab, and look where the actual link is located. If it is in the public profile you will need an administrator to help you.

If the file exists in your profile, you may set the hidden attribute on the filename for the icon to make it disappear:
attrib +h Microsoft*.lnk


The desktop should now be less cluttered with the icon hidden.


If the lnk file is in the Windows public profile and you can become adminstrator, then start the command prompt as administrator. Go to the directory and set the hidden flag:
C:\Users\Public\Desktop> attrib +h Microsoft*.lnk

Sunday, January 02, 2022

Tar and Curl in MS Windows 10

I wanted to scp a deep directory structure to a unix machine. In MS Windows 10, I tried to use the File Explorer to click once on the directory and right-click to use the SendTo and choose "Compressed (zipped) folder". That did not work and there was no error message. It simply failed silently.

I opened a PowerShell and found, to my surprise, that both curl and tar are now in Windows 10. To put directories and files into one larger file, the tar command may be used. By itself tar does not compress, though it put everything into one file to make it easier to take a snapshot of a directory structure.

The basics of tar on MS Windows 10 is to open a PowerShell window. Navigate to the top of the directory structure. Type:
tar -cf filename1 filename2 directory3 directory4 newTARfilename.tar

If you want to have ongoing feedback from the command, add the verbose flag:
tar -cvf filename1 filename2 directory3 directory4 newTARfilename.tar

This example uses PowerShell and shows the tar help, the directory, and the tar command.

PS C:\temp\showcompress> tar /?
Usage:
  List:    tar.exe -tf <archive-filename>
  Extract: tar.exe -xf <archive-filename>
  Create:  tar.exe -cf <archive-filename> [filenames...]
  Help:    tar.exe --help
PS C:\temp\showcompress> dir


    Directory: C:\temp\showcompress


Mode                 LastWriteTime         Length Name
----                 -------------         ------ ----
d-----        2021-12-29     15:59                DecemberFolder


PS C:\temp\showcompress> tar -cf DecemberFolder.tar DecemberFolder
PS C:\temp\showcompress> dir


    Directory: C:\temp\showcompress


Mode                 LastWriteTime         Length Name
----                 -------------         ------ ----
d-----        2021-12-29     15:59                DecemberFolder
-a----        2021-12-30     00:22    39059677696 DecemberFolder.tar


You may also want to explore the Compress-Archive command in Powershell.


An example curl command will look like:

C:\>curl 2600.com
<!DOCTYPE HTML PUBLIC "-//IETF//DTD HTML 2.0//EN">
<html><head>
<title>302 Found</title>
</head><body>
<h1>Found</h1>
<p>The document has moved <a href="https://2600.com/">here</a>.</p>
</body></html>

Tuesday, December 14, 2021

Remove Apps From MS Windows 10

Microsoft is push-installing many more applications in Windows 10. A user may remove some applications by clicking the Start button then right-click on an app and choose uninstall. The uninstall option is not available for many apps installed by Microsoft.

This list of MS Windows 10 PowerShell application removal lines can work on some versions of Windows, and may depend on the current naming and the build number of Windows. The following were tested on several versions of Windows 10, including Microsoft Windows 10 Pro version 10.0.19043 N/A Build 19043.

Right-click on the Start button and choose: Windows PowerShell

If you are not able to run PowerShell as administrator in order to remove the application packages for all users, you will receive an error:
Get-AppxPackage : Access is denied.
Access is denied.


You may instead run the following commands without this option: -Allusers
If the following commands are not working with "-Allusers", try do remove that and run the command again.


If you are looking for application package names to install, try this example for the Solitaire game:
> Get-AppxPackage | select-string  "solitaire"

Microsoft.MicrosoftSolitaireCollection_4.4.8204.0_x64__8wekyb3d8bbwe

Then use "solitaire" and remove the game:
Get-AppxPackage *solitaire* | Remove-AppxPackage


List of what you may want to remove. If you are not logged in as administrator, remove "-AllUsers" from the following:

Get-AppxPackage Microsoft.YourPhone -AllUsers | Remove-AppxPackage
# or
Get-AppxPackage *windowsphone* -AllUsers | Remove-AppxPackage


Get-AppxPackage *xbox* -AllUsers | Remove-AppxPackage


Get-AppxPackage *3dbuilder* -AllUsers | Remove-AppxPackage

Get-AppxPackage Microsoft.Microsoft3DViewer -AllUsers | Remove-AppxPackage


Get-AppxPackage *people* -AllUsers | Remove-AppxPackage
# or
Get-AppxPackage Microsoft.Windows.PeopleExperienceHost -AllUsers | Remove-AppxPackage
# or
Get-AppxPackage Microsoft.people -AllUsers | Remove-AppxPackage


# Cortana
Get-AppxPackage Microsoft.549981C3F5F10 -AllUsers | Remove-AppxPackage

Get-AppxPackage *Microsoft.GetHelp* -AllUsers | Remove-AppxPackage

Get-AppxPackage *windowsalarms* -AllUsers | Remove-AppxPackage

Get-AppxPackage *windowscommunicationsapps* -AllUsers | Remove-AppxPackage

Get-AppxPackage *skypeapp* -AllUsers | Remove-AppxPackage

Get-AppxPackage *officehub* -AllUsers | Remove-AppxPackage

Get-AppxPackage *getstarted* -AllUsers | Remove-AppxPackage

Get-AppxPackage *onenote* -AllUsers | Remove-AppxPackage

Get-AppxPackage *bingweather* -AllUsers | Remove-AppxPackage

Get-AppxPackage *windowscamera* -AllUsers | Remove-AppxPackage

Get-AppxPackage *windowsmaps* -AllUsers | Remove-AppxPackage

Get-AppxPackage Microsoft.WindowsFeedbackHub -AllUsers Remove-AppxPackage

Get-AppxPackage *music* -AllUsers Remove-AppxPackage

Get-AppxPackage *solitaire* -AllUsers | Remove-AppxPackage

Get-AppxPackage *portal* -AllUsers | Remove-AppxPackage

Get-AppxPackage *stickynotes* -AllUsers | Remove-AppxPackage

# Movies & TV

Get-AppxPackage *zunevideo* -AllUsers | Remove-AppxPackage

# Snip & Sketch
Get-AppxPackage *screensketch* -AllUsers | Remove-AppxPackage

# Sound Recorder
Get-AppxPackage *soundrecorder* -AllUsers | Remove-AppxPackage


Microsoft OneDrive may be removed from within the legacy "Control Panel" application. Press Start button, then begin typing "control panel".


After you have uninstalled applications, it is usually useful to create a Windows "restore point" to snapshot the current configuration. If you feel more advanced, you may want to explore the "Services" app to stop services you may not be using.

Monday, October 18, 2021

Disable Windows 10 Search Advertising

This post covers two topics which are similar though separate - File Explorer search box suggestions; and Start Button search advertising.


In Windows 10, the File Explorer shows suggestion pop-ups when you begin to type in the File Explorer search box. While tolerable, it becomes annoying if you frequently search. If you prefer for the File Explorer search box to return search results after you are done typing, the search pop-up functionality may be disabled.


If you have a Windows 10 version with group policy editor, press the Start Button and type: gpedit Run the Edit Group Policy application as administrator. In the group policy editor, go to User Configuration, Administrative Templates, Windows Components, File Explorer.


Edit the entry for "Turn off display of recent search entries in the File Explorer search box". Choose "Disabled" and press OK button.


The setting should now be Disabled.


A separate issue with Windows 10 is invasive keystroke monitoring and advertising. Press the Start Button and begin to type a program name or file name. Windows 10 will show matching program names, file names, and also provide search engine results. This is like a mini search engine in the Start Button based on your typing and geo-location. If you type "burgers", not only will it search for local programs and files named "burgers", but you will also get a review of where to locally purchase burgers and a map for local burger shops. Microsoft calls this feature Web search.  Many people call it "intrusive and annoying". There does not appear to be an intuitive and easy way to turn off this advertising.

 
This feature can be turned off with the registry editor. Press the Start Button and type: regedit
Run the Registry Editor application as administrator. The registry key will include Computer\HKEY_CURRENT_USER\SOFTWARE\Policies\Microsoft\Windows. (While it may appear the key Computer\HKEY_LOCAL_MACHINE\SOFTWARE\Policies\Microsoft\Windows\Explorer can configure this for all users, it doesn't seem to work.)
Confirm this registry key exists, or add it: Computer\HKEY_CURRENT_USER\SOFTWARE\Policies\Microsoft\Windows\Explorer

Right-click on the "Explorer" key, and add a new DWORD 32-bit value with name: DisableSearchSuggestions


Set the value to 1.


Reboot the computer and test that the Start Button advertising functionality has been disabled.

Tuesday, October 12, 2021

Tuning Microsoft Windows for CPU Cryptocurrency Mining

This post covered setup and basic configuration of a Monero crypto miner on Microsoft Windows.

The PC had 16GB of RAM, and rarely used more than 9GB of RAM. In the Performance tab of Task Manager, under Memory, it shows the amount of RAM in use and the amount compressed. RAM compression uses a small (and typically unnoticeable amount of CPU to compress RAM pages which are not being used. While compressed RAM pages can't actually be used by a process when they are compressed, the idea is that by compressing RAM it may avoid swapping RAM to disk in a low-memory situation. Certainly reading swapped pages from disk should be considerably slower than  using CPU to uncompress RAM pages which are already in memory. For anyone using a machine which is not using all of the RAM, this is an optimization looking for a problem - if the machine is not swapping, then there is no RAM slowdown due to swapping. Compressing RAM when there is not a RAM shortage slightly increases CPU use. While the small additional CPU use may not be noticeable on many workloads, it can be noticeable and detrimental to do this speculative RAM optimization when the CPU is already near 100% usage, as is typical when mining a cryptocurrency on CPUs.


With the machine not in danger of swapping in-memory RAM pages to disk, let's turn off RAM compression. In the worst case if a process takes more RAM than the installed 16GB, some pages will be swapped to disk as has been standard for decades.

In this example with the Monero miner and a web browser and other applications, Task Manager shows the machine had 5.2GB available and 1.6GB compressed of 15.9GB total RAM. Even if the compressed RAM is uncompressed at triple the compressed size, everything should still fit into the real 15.9GB of RAM.


Let's look at the current RAM compression setting. Right-click on the Start Button and choose "Windows PowerShell (Admin)". Then in PowerShell run this command: Get-MMAgent

This shows "MemoryCompression" is set to True. This confirms what can be seen in the Task Manager, that some amount of the memory was "Compressed". Get some statistics with: Get-Process -Name "Memory Compression"

Disable RAM compression with: Disable-MMAgent -MemoryCompression

Reboot so the change will take effect. After reboot, use PowerShell to check that the setting is False with: Get-MMAgent

Run your typical processes, and also run the Monero crypto miner. Look at Task Manager. In this example, Task Manager shows about 7GB of RAM available without using compression. Note that "(Compressed)" is zero.


Presumably the Microsoft Windows 10 developers put considerable effort into optimizing the RAM compression code. When a machine is pushed to limits such as nearly 100% CPU, there may be noticeable performance differences when turning off the speculative RAM compression. In general use, we should expect to find the changes basically unnoticeable from a user interface standpoint. On CPU-bound processes like crypto mining we might be able to see a performance change. I was surprised to find a consistent increase in Monero mining performance (measured via hashes per second) of over 15%. The peak hash per second increased over 20%.

While this dramatic increase was unexpected, it shows the dangers of premature optimization ("let's do RAM compression just because it might be good"). It also shows the benefit of benchmarking before and after a change. Both before and after the change the "huge pages" mining feature was enabled.


October 17 update on Monero miner tuning - it makes a small difference by forcing the miner to avoid using CPU core 0. On the machine in this example, there are four CPU cores. The mining process consistently starts three processes, which leaves one of the cores unused. The unused core was consistently core 3, and cores 0 - 2 were consistently pegged at 100% CPU usage. On a hunch that hardware interrupts may still be serviced by core 0, I used Task Manager to set processor affinity to cores 1 - 3. This had the effect of moving the miner process off core 0.

Task Manager shows a process named "System interrupts". This is more of an indication of interrupts rather than a real process. If a hardware driver is misbehaving, this process could indicate greater than zero CPU usage. In a properly functioning system, interrupts should have nearly zero CPU usage. It is possible that even with low CPU usage, interrupts are causing miner code removal from the core along with possible small CPU cache issues.


The Performance Monitor application allowed viewing of percentage interrupt time. Right-click and choose "Add counters" then look for "Processor information" to find "% Interrupt Time". The first counter in the following graph is the overall interrupt counter and one counter for each of the four CPU cores. The scale on the graph is increased from 1 to 100 to highlight the differences. CPU core zero (colored red) frequently spikes. The overall interrupt (color blue) also spikes though is tempered by the other CPUs. The lines for CPUs 1 - 3 are flatlined against the bottom of the graph. This shows interrupts are being serviced by CPU 0. Therefore, removing the mining process from CPU 0 should provide smoother process execution as measured by better program throughput.


Looking at the hashes per second of the monero miner process, the high-water mark increased about 6% and a day the average hashes per second increased about 3%. On a mining process, a 3% increase in performance at no hardware cost is a nice improvement. A more precise performance measurement would need a dedicated machine running without other programs and measured for several days.

The following line has been added to the command file to set the processor affinity when the miner is started:
start /BELOWNORMAL /affinity E /b E:\tech\crypto\monero\GUIs\xmrig-6.15.1-msvc-win64\xmrig-6.15.1\xmrig.exe -o pool.supportxmr.com:443 -u 44YkNzrdJnmAqwoTRMPV2e4fihv3AfZ5vMmrtaWCGQaxKuXp5eiZeRREzhPi9tVqGuA3VBRriNwKa2QxmZmRGmHVTkUSTMc -k --tls -p runDemoA

While affinity "E" works for this four-core system, it depends on your CPU core count along with available hyper-threads so please view this post to determine the binary number. Then view this website to convert the binary number to hexadecimal to use with the "affinity" flag of the "start" command.

Affinity "E" will put threads on CPU cores 1 and 2 and 3, so use this for a process with three threads - using this with 1 or 2 threads will typically shift the CPU core over time, which can be seen in Task Manager cpu view. Affinity "A" would be two threads on CPU cores 1 and 3. Please verify the number of threads in the program, and match that to specific CPU cores by using the correct hexadecimal value which you can find in the prior links.


Tuning update for CPU hyper-threading:

Hyper-threading allows a CPU core to support, typically, two separate threads. The idea is that usually threads do not use the maximum available CPU on a core (not completely CPU bound) because program code often waits for network or disk or user interaction. During that time of waiting, the other thread can run on the CPU core. If the CPU core is already 100% consumed by a thread then adding another thread does not increase throughput.

BIOS settings can often turn off CPU hyper-threading, though this may not be available in some laptop BIOS. Using BIOS to turn off and on hyper-threading, the miner ran about 2.5% better with hyper-threading off. Throughput went from 826 hashes per second to 846 hashes per second. This was tested on two separate machines of the same make and model, with similar performance improvements on both machines.


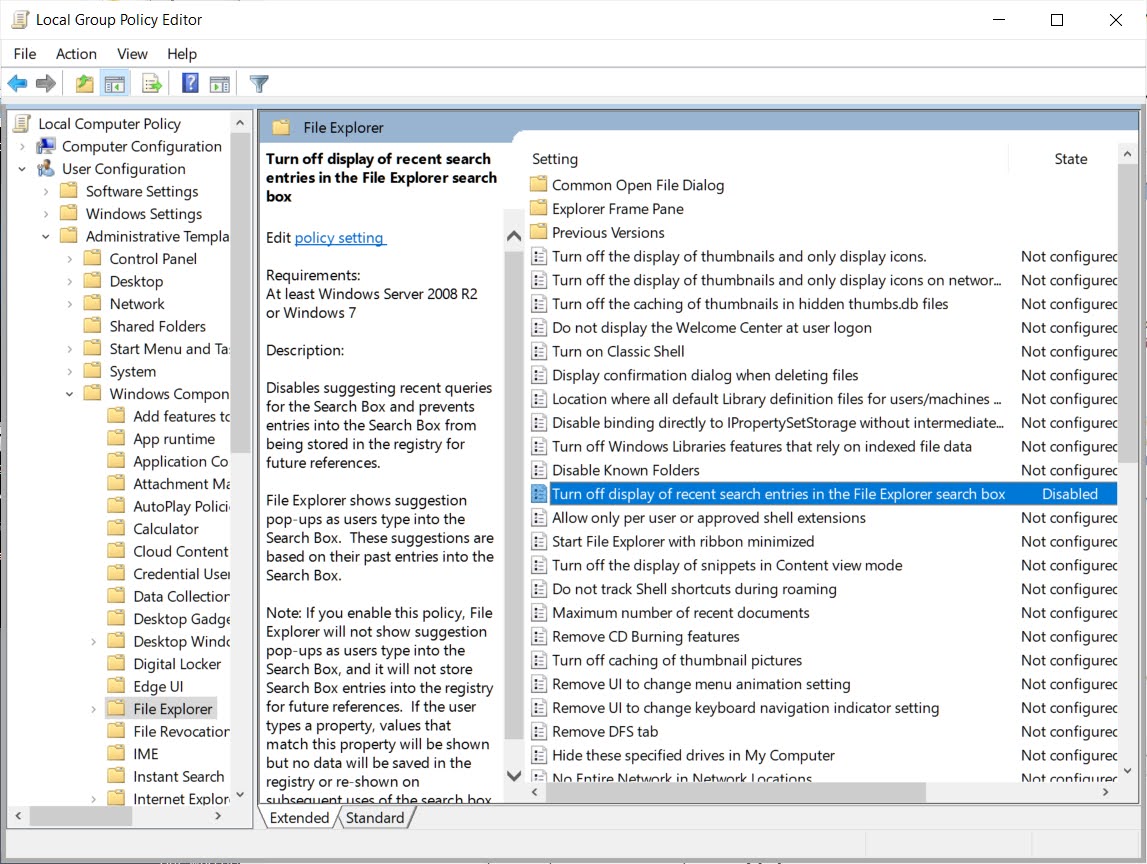
This page has instructions on becoming a MS Windows user with Admin privilege to set the "lock pages" feature, which is also known as huge pages. To summarize, run the Local Security Policy editor, choose Local Policies, choose User Rights Assignment, choose Lock Pages In Memory, and double-click and add the user.


Sunday, October 10, 2021

How to mine Monero on Microsoft Windows

If you are interested in trying to try out mining a cryptocurrency, this guide can be used by most people - even those with low internet bandwidth and a weak or old computer. You will learn the mechanics of how to mine a cryptocurrency through a pool, though don't expect to make much money.

Bitcoin was the original cryptocurrency, with the proof of work software released in January 2009. Proof of work means the cryptocurrency mining software performs calculations using the CPU to determine which miner will put the next block of transactions onto the blockchain. The Bitcoin software can still be run on CPUs, though the majority of the miners use specialized hardware which is optimized to specifically run the Bitcoin mining algorithm. 

The other well-known mining algorithm is proof of stake. In general, this requires a person to "stake" tokens or coins as collateral. Based on shares or round-robin or other methodology, a staker is chosen to submit the next block of transactions. If an invalid block is submitted, others can slash the staked tokens as a penalty.

Ethereum is a proof of work cryptocurrency which is undergoing changes which will allow the network to move to proof of stake. Some people consider proof of stake to have advantages over proof of work, including using a small fraction of the electricity consumed by proof of work blockchains.

Monero is a proof of work blockchain which is specifically designed to be mined only on computer CPUs. This makes mining on video graphics cards or specialized hardware difficult and not cost effective. By allowing anyone to run the mining code on a CPU and to be competitive, Monero aims to create a larger and more distributed group of miners.


This post focuses on running Monero mining software on Microsoft Windows through a mining pool. The mining pool reduces network and storage costs by relieving the client machine from hosting the full node software to route and store transactions. While this allows a person to more easily mine, it does reduce the usefulness of the mining node to submit and validate transactions. Nonetheless, mining Monero through a pool is a good way to gain mining experience.


The basic tasks for running a Monero mining node is to download and install the software, create a wallet, and then run and monitor the mining code.

The cryptocurrency wallet creates and stores a private key / public key pair. The wallet can typically view balances and send and receive coins.

For now, let's focus on mining using Microsoft Windows, a wallet, and the xmrig software. Download the xmrig software from github. Look for the win64 version. Use Windows File Explorer to uncompress the zipped folder. Go into the folder structure (currently it looks like "xmrig-6.15.1-msvc-win64\xmrig-6.15.1"). Create a file named something like startminer.cmd as a txt file. This is a Windows Command Script file which will contain your settings and run the miner.

Edit startminer.cmd and add these three lines:
@echo off
xmrig.exe -o pool.supportxmr.com:443 -u 44YkNzrdJnmAqwoTRMPV2e4fihv3AfZ5vMmrtaWCGQaxKuXp5eiZeRREzhPi9tVqGuA3VBRriNwKa2QxmZmRGmHVTkUSTMc -k --tls -p runDemoA
pause

Open a command prompt by pressing Windows Start Button, type cmd, and click on the Command Prompt app. Go to the location of the startminer.cmd file. Type: startminer.cmd 
Depending on your internet filtering and DNS settings, you may see some warnings. Also, Microsoft Windows security may flag the miner as being a cryptocurrency miner trojan. Since you want to be mining, disable this specific security warning.

After the miner is running, you may use a web browser to monitor your miner. Please note the mining pool at SupportXMR receives at least a 1% fee for their services, and any mining rewards will go to the address in the command script which starts with "44...".

The Command Prompt window will continue to show output from the miner. In the following picture, the first two orange circles show that Microsoft Windows has "core isolation" memory integrity turned on and that it uses a Virtual Machine. If your operating system is running with the VM on (probably a good thing for most people), ignore these apparent errors in the first two orange circles. The third orange circle shows the current mining work output. This picture is from an older machine which shows how a CPU which is several years old can be used to mine transactions via a mining pool.

To monitor the miner in the mining pool, go to SupportXMR.com and enter the public key from the Command Script file: 44YkNzrdJnmAqwoTRMPV2e4fihv3AfZ5vMmrtaWCGQaxKuXp5eiZeRREzhPi9tVqGuA3VBRriNwKa2QxmZmRGmHVTkUSTMc

You will be able to see information including the custom name in the startminer.cmd file, along with your hash rate.


It is typically good to lower the operating system priority of the mining process to reduce interference with other processes on the machine. You certainly want to lower the priority if you are also using the machine for regular play and work. Right-click on the Windows Start Button and click on Task Manager. In task manager click on the Details tab. Click on the CPU column so the highest CPU consumer will appear at the top. This will typically be the xmrig.exe mining software. Right-click on the xmrig.exe line, and set the Priority to Below Normal.

Download the wallet software and install the program. Create a new wallet, and write down the recovery words. Learn more by reading the wallet README.


Copy the wallet primary account address and the public key from the GUI wallet. You can put that address into your Command Script file and restart the miner to allow any rewards to go to your wallet.


Saturday, October 09, 2021

Microsoft Windows File Explorer Customization

The File Explorer in Microsoft Windows allows access to various context-sensitive menus by right-clicking the mouse button. You may customize many of the menus. This post will show you how to modify the context-sensitive menus for "new" file, "open with", and "send to".

The "new" menu may already have items for BMP image and several other document types. Look at your configuration by going to an empty place on the Desktop or in File Explorer, right-click the mouse button, and go to New.


Let's add an item to create a new JPEG image. Press the Windows Start Button and type registry. Click on the Registry Editor app. 

In the Registry Editor go to registry key: HKEY_CLASSES_ROOT\.jpg

Right-click on ".jpg" and add a new Key with name ShellNew.

In ShellNew, create a new "String Value" with value of FileName. Modify the FileName entry with "Value Data" of Template.jpg.


You may close the Registry Editor. Now right-click on the Desktop or in File Explorer, go to New, and there should be an option to create a new JPEG image.


The context-sensitive Open With menu shows appropriate choices for each file type. Because there are many file types, there are many settings which may be shown depending on the file type. In the following picture, this is a text file and the file type is ".txt".


Create the new text document, then right-click on the file and go to the Open With entry. You should see various text editors.


These settings are stored in the Windows registry and may be modified with the Registry Editor for each file type.

Let's add a program in the Open With menu. Click on the Windows Start Button, type regedit, and click on Registry Editor.

In the left pane of the Registry Editor, go to key: HKEY_CURRENT_USER\SOFTWARE\Microsoft\Windows\CurrentVersion\Explorer\FileExts\

Go to the .txt entry, and click on OpenWithList.


Add the office writer application to the Open With menu for ".txt" files. In the right-hand panel, right-click and press New, String Value. The Value Name should be the next letter in the alphabet. 

Double-click the new entry and in the Value Data field add the office writer application of "soffice.exe".


Now when you go to the Open With item, you should see the office writer application as a choice.

While you are in Registry Editor, you may also remove items. Go to the file type, select the item, and then press Delete.


The Send To in File Explorer is a context-sensitive menu which appears when you right-click an item. Let's add an item to the list.


Press the Windows Start Button and type: run
Click the Run App. In the Run app, enter shell:sendto and press the OK button.


This will open a folder which contains the various items. 


Delete any items you do not want by selecting the item and deleting it. 


Add items by copying a shortcut to the program into this folder. For example, if you would like Microsoft Paint to appear in the Send To menu, find the path to the program (Start Button, scroll to Windows Accessories and expand it, right-click on Paint, choose More, then choose Open File Location. After the File Explorer window open, right-click on Paint and choose Copy. In the SendTo folder, right-click on a white sort and choose Paste Shortcut.)


The SendTo folder will look like:


Now when you are in File Explorer and right-click an item to display the context-sensitive menu, Send To will show the new entry which you just added. It may be useful to add the Notepad application to the Send To menu to make it easy to quickly bring up the editor for working with ".cmd" files (Windows command script files or batch files).