Sunday, January 02, 2022

Tar and Curl in MS Windows 10

I wanted to scp a deep directory structure to a unix machine. In MS Windows 10, I tried to use the File Explorer to click once on the directory and right-click to use the SendTo and choose "Compressed (zipped) folder". That did not work and there was no error message. It simply failed silently.

I opened a PowerShell and found, to my surprise, that both curl and tar are now in Windows 10. To put directories and files into one larger file, the tar command may be used. By itself tar does not compress, though it put everything into one file to make it easier to take a snapshot of a directory structure.

The basics of tar on MS Windows 10 is to open a PowerShell window. Navigate to the top of the directory structure. Type:
tar -cf filename1 filename2 directory3 directory4 newTARfilename.tar

If you want to have ongoing feedback from the command, add the verbose flag:
tar -cvf filename1 filename2 directory3 directory4 newTARfilename.tar

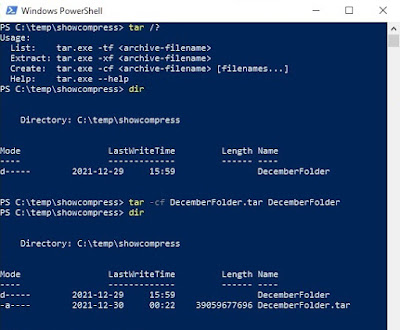
This example uses PowerShell and shows the tar help, the directory, and the tar command.

PS C:\temp\showcompress> tar /?
Usage:
  List:    tar.exe -tf <archive-filename>
  Extract: tar.exe -xf <archive-filename>
  Create:  tar.exe -cf <archive-filename> [filenames...]
  Help:    tar.exe --help
PS C:\temp\showcompress> dir


    Directory: C:\temp\showcompress


Mode                 LastWriteTime         Length Name
----                 -------------         ------ ----
d-----        2021-12-29     15:59                DecemberFolder


PS C:\temp\showcompress> tar -cf DecemberFolder.tar DecemberFolder
PS C:\temp\showcompress> dir


    Directory: C:\temp\showcompress


Mode                 LastWriteTime         Length Name
----                 -------------         ------ ----
d-----        2021-12-29     15:59                DecemberFolder
-a----        2021-12-30     00:22    39059677696 DecemberFolder.tar


You may also want to explore the Compress-Archive command in Powershell.


An example curl command will look like:

C:\>curl 2600.com
<!DOCTYPE HTML PUBLIC "-//IETF//DTD HTML 2.0//EN">
<html><head>
<title>302 Found</title>
</head><body>
<h1>Found</h1>
<p>The document has moved <a href="https://2600.com/">here</a>.</p>
</body></html>

Tuesday, December 14, 2021

Remove Apps From MS Windows 10

Microsoft is push-installing many more applications in Windows 10. A user may remove some applications by clicking the Start button then right-click on an app and choose uninstall. The uninstall option is not available for many apps installed by Microsoft.

This list of MS Windows 10 PowerShell application removal lines can work on some versions of Windows, and may depend on the current naming and the build number of Windows. The following were tested on several versions of Windows 10, including Microsoft Windows 10 Pro version 10.0.19043 N/A Build 19043.

Right-click on the Start button and choose: Windows PowerShell

If you are not able to run PowerShell as administrator in order to remove the application packages for all users, you will receive an error:
Get-AppxPackage : Access is denied.
Access is denied.


You may instead run the following commands without this option: -Allusers
If the following commands are not working with "-Allusers", try do remove that and run the command again.


If you are looking for application package names to install, try this example for the Solitaire game:
> Get-AppxPackage | select-string  "solitaire"

Microsoft.MicrosoftSolitaireCollection_4.4.8204.0_x64__8wekyb3d8bbwe

Then use "solitaire" and remove the game:
Get-AppxPackage *solitaire* | Remove-AppxPackage


List of what you may want to remove. If you are not logged in as administrator, remove "-AllUsers" from the following:

Get-AppxPackage Microsoft.YourPhone -AllUsers | Remove-AppxPackage
# or
Get-AppxPackage *windowsphone* -AllUsers | Remove-AppxPackage


Get-AppxPackage *xbox* -AllUsers | Remove-AppxPackage


Get-AppxPackage *3dbuilder* -AllUsers | Remove-AppxPackage

Get-AppxPackage Microsoft.Microsoft3DViewer -AllUsers | Remove-AppxPackage


Get-AppxPackage *people* -AllUsers | Remove-AppxPackage
# or
Get-AppxPackage Microsoft.Windows.PeopleExperienceHost -AllUsers | Remove-AppxPackage
# or
Get-AppxPackage Microsoft.people -AllUsers | Remove-AppxPackage


# Cortana
Get-AppxPackage Microsoft.549981C3F5F10 -AllUsers | Remove-AppxPackage

Get-AppxPackage *Microsoft.GetHelp* -AllUsers | Remove-AppxPackage

Get-AppxPackage *windowsalarms* -AllUsers | Remove-AppxPackage

Get-AppxPackage *windowscommunicationsapps* -AllUsers | Remove-AppxPackage

Get-AppxPackage *skypeapp* -AllUsers | Remove-AppxPackage

Get-AppxPackage *officehub* -AllUsers | Remove-AppxPackage

Get-AppxPackage *getstarted* -AllUsers | Remove-AppxPackage

Get-AppxPackage *onenote* -AllUsers | Remove-AppxPackage

Get-AppxPackage *bingweather* -AllUsers | Remove-AppxPackage

Get-AppxPackage *windowscamera* -AllUsers | Remove-AppxPackage

Get-AppxPackage *windowsmaps* -AllUsers | Remove-AppxPackage

Get-AppxPackage Microsoft.WindowsFeedbackHub -AllUsers Remove-AppxPackage

Get-AppxPackage *music* -AllUsers Remove-AppxPackage

Get-AppxPackage *solitaire* -AllUsers | Remove-AppxPackage

Get-AppxPackage *portal* -AllUsers | Remove-AppxPackage

Get-AppxPackage *stickynotes* -AllUsers | Remove-AppxPackage

# Movies & TV

Get-AppxPackage *zunevideo* -AllUsers | Remove-AppxPackage

# Snip & Sketch
Get-AppxPackage *screensketch* -AllUsers | Remove-AppxPackage

# Sound Recorder
Get-AppxPackage *soundrecorder* -AllUsers | Remove-AppxPackage


Microsoft OneDrive may be removed from within the legacy "Control Panel" application. Press Start button, then begin typing "control panel".


After you have uninstalled applications, it is usually useful to create a Windows "restore point" to snapshot the current configuration. If you feel more advanced, you may want to explore the "Services" app to stop services you may not be using.

Monday, October 18, 2021

Disable Windows 10 Search Advertising

This post covers two topics which are similar though separate - File Explorer search box suggestions; and Start Button search advertising.


In Windows 10, the File Explorer shows suggestion pop-ups when you begin to type in the File Explorer search box. While tolerable, it becomes annoying if you frequently search. If you prefer for the File Explorer search box to return search results after you are done typing, the search pop-up functionality may be disabled.


If you have a Windows 10 version with group policy editor, press the Start Button and type: gpedit Run the Edit Group Policy application as administrator. In the group policy editor, go to User Configuration, Administrative Templates, Windows Components, File Explorer.


Edit the entry for "Turn off display of recent search entries in the File Explorer search box". Choose "Disabled" and press OK button.


The setting should now be Disabled.


A separate issue with Windows 10 is invasive keystroke monitoring and advertising. Press the Start Button and begin to type a program name or file name. Windows 10 will show matching program names, file names, and also provide search engine results. This is like a mini search engine in the Start Button based on your typing and geo-location. If you type "burgers", not only will it search for local programs and files named "burgers", but you will also get a review of where to locally purchase burgers and a map for local burger shops. Microsoft calls this feature Web search.  Many people call it "intrusive and annoying". There does not appear to be an intuitive and easy way to turn off this advertising.

 
This feature can be turned off with the registry editor. Press the Start Button and type: regedit
Run the Registry Editor application as administrator. The registry key will include Computer\HKEY_CURRENT_USER\SOFTWARE\Policies\Microsoft\Windows. (While it may appear the key Computer\HKEY_LOCAL_MACHINE\SOFTWARE\Policies\Microsoft\Windows\Explorer can configure this for all users, it doesn't seem to work.)
Confirm this registry key exists, or add it: Computer\HKEY_CURRENT_USER\SOFTWARE\Policies\Microsoft\Windows\Explorer

Right-click on the "Explorer" key, and add a new DWORD 32-bit value with name: DisableSearchSuggestions


Set the value to 1.


Reboot the computer and test that the Start Button advertising functionality has been disabled.